PowerPoint: How to Add Sound to Powerpoint on Windows ten and Mac
Last updated
Microsoft PowerPoint offers features to record sound narration and export as a video. PowerPoint records sound slide-by-slide rather than in one continuous file, assuasive creators to hands re-tape a slide if they make a mistake or demand to change something later. Exporting as a video and uploading to Kaltura or Canvass for streaming is advantageous since information technology standardizes file types, doesn't require a download to view, is in a format that can be captioned, and allows viewers to navigate more efficiently.
A recent update has made the process comparable on a Mac, only the specifics vary. Windows ten instructions follow; Mac users can click the link beneath to bound to the appropriate instructions.
- Instructions for Mac users
Windows 10 Instructions:
The following instructions explain how to add together audio to your PowerPoint presentation on Windows 10 and export that PowerPoint as an MP4. The text instructions embrace the aforementioned information as the embedded video below.
Notation: If you have an older version of PowerPoint, you lot may need to update information technology to admission the features described below. If you exercise not have PowerPoint, yous tin can download it and other Microsoft Role products for complimentary past going to office365.uwec.edu. If yous have questions most updating or installing PowerPoint, contact the LTS Help Desk-bound at helpdesk@uwec.edu or 715-836-5711.
- Design your PowerPoint
TIP: Use images and limit text to better engage viewers/listeners.
- Click the Slide Bear witness tab
Notation: Do non add together audio nether Insert and Record Audio; this method will not allow y'all to relieve your PowerPoint as a video since it does not synchronize timings to automatically move the slides with the audio.

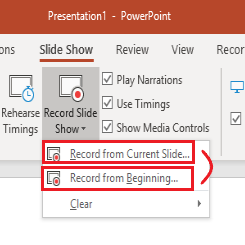
- Click Record Slide Prove
NOTE: Audio may start recording automatically if you have an older version of PowerPoint. It will still piece of work, but this version offers reduced functionality. - Select Record from Current Slide or Record from Beginning depending on your needs
NOTE: Any PowerPoint slide can be re-recorded by clicking Record Slide Show and Selecting Record from Current Slide .
- Click Record to start recording narration for a slide.
Note: PowerPoint will give a three-2nd inaugural before it begins recording.
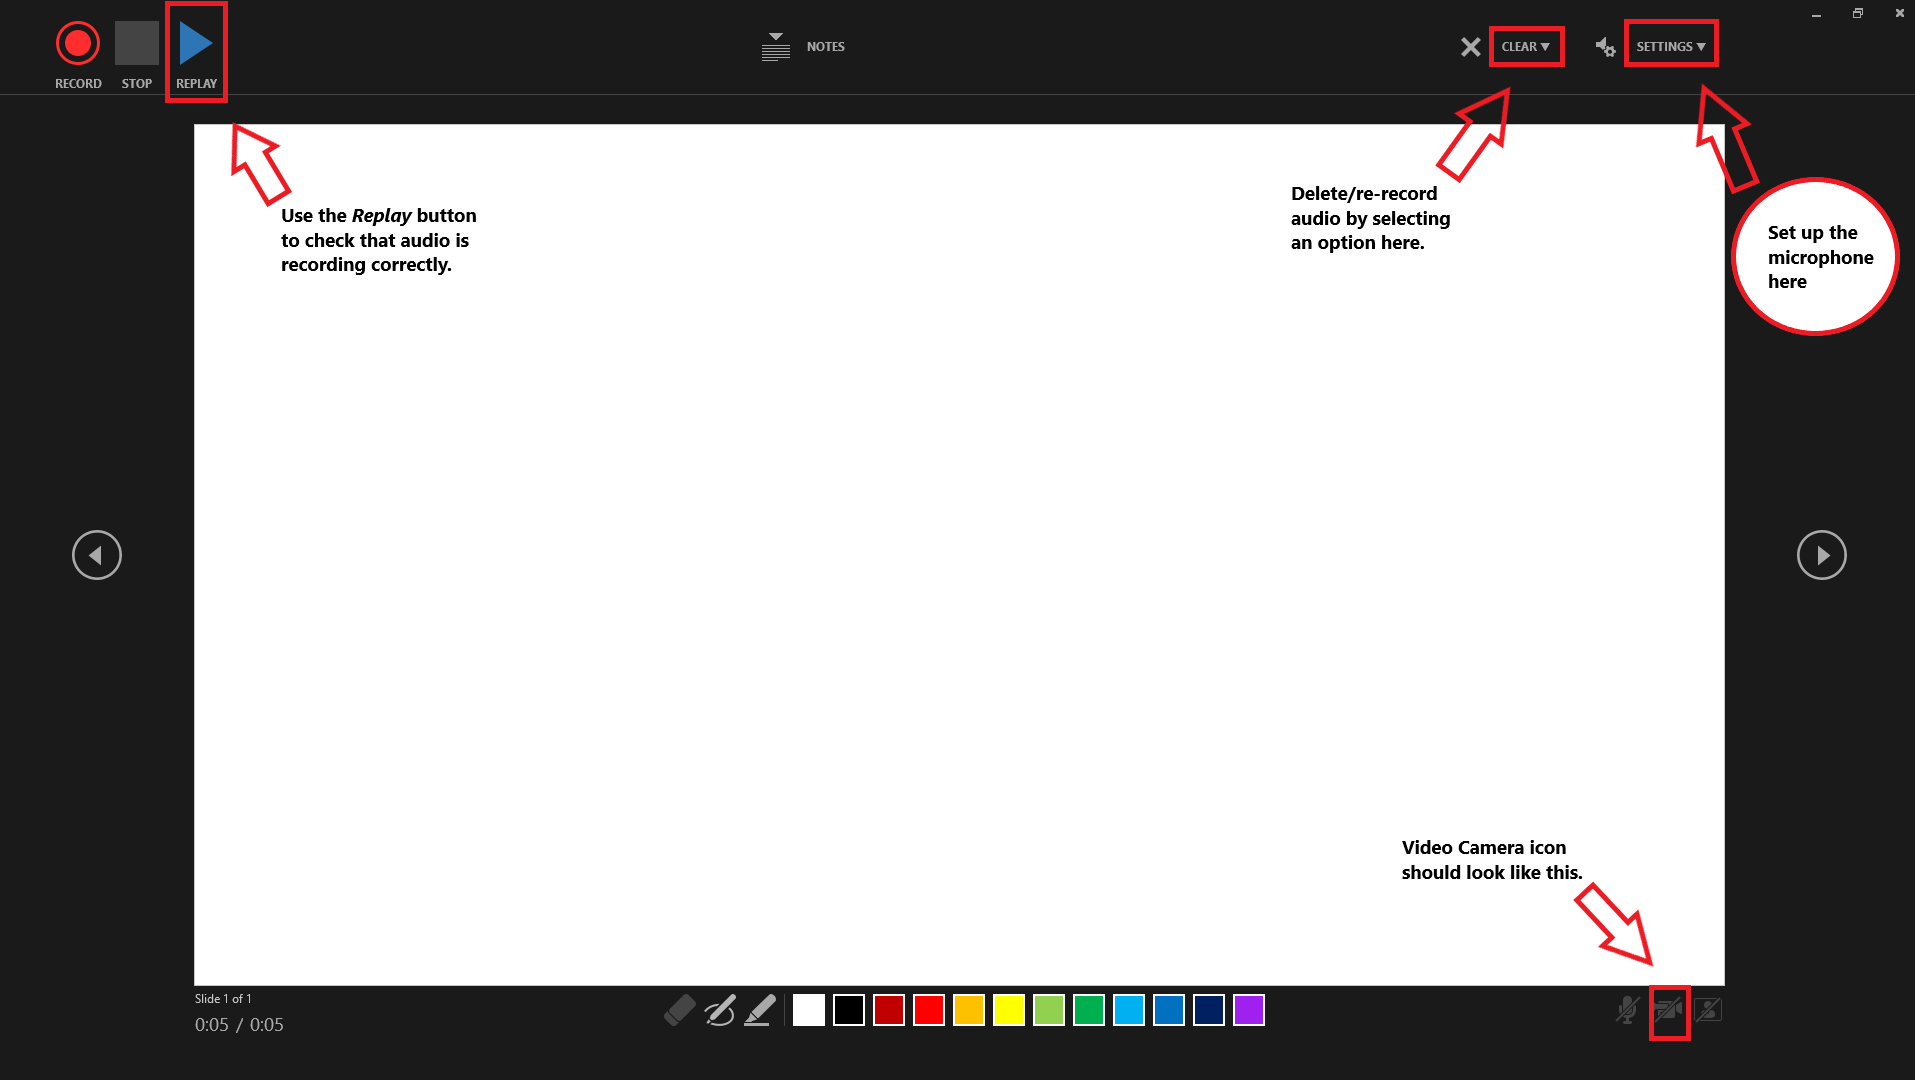
- Record narration and avert reading text on the slide out loud to viewers. Click the blue Replay button to listen to the recorded audio and ensure it was recording.
- Click the
 accelerate push button, that reads Advance to the adjacent blitheness or slide to record the narration for the next slide IMPORTANT: Stop speaking for a second to prevent the audio from cutting out.
 - Printing [Escape] or the 'X' button located in the top right of the screen when the audio recordings are finished. You will see a speaker icon on slides that have sound.
- Save the video by first clicking File. We recommend saving your file as a regular PowerPoint before following the next steps for exporting your PowerPoint.

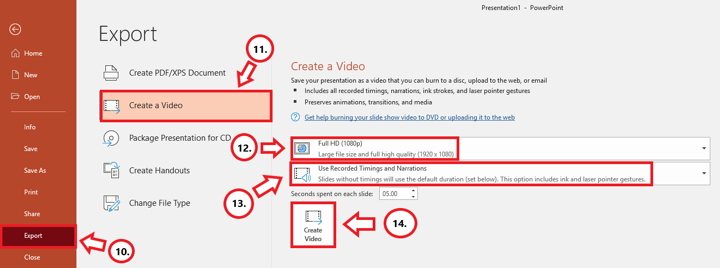
- Select Export (steps 10-14 are shown in screenshot below).
- Select Create a Video.
- Optional: Select Full Hard disk (1080p) for the video quality; it is unlikely a higher quality is needed.
- Select Use Recorded Timings and Narrations.
- Click Create Video.
- Follow prompt/popular-upward window to salvage the video in a memorable location.
- Monitor the progress indicator at the bottom of the screen to determine when the video is done exporting.
NOTE: PowerPoint does not give an indication of how long the video volition take to export or a notification that information technology is done.
- Upload your mp4 video to Kaltura or Sail to share it:
- How to upload and share with Kaltura (Instructors should use Kaltura. Students volition need to use it if the file is over 500 MB, which a PowerPoint probably won't be and they can use Canvas.)
- How to upload and share in a Canvass consignment (students)
- How to upload and share in a Canvas discussion (students) - the instructions refer to the "rich content editor" which is just the features in the superlative of the discussion mail respond.
Elaboration on the Recording Features:
- Timing Feature – there is a rolling time feature for the individual slide and the overall presentation. Allows the speaker/presenter to monitor how long they are talking.
- Microphone Feature - Click on Settings and select Microphone and and then the specific device to prepare before recording.
- Replay Feature - Use to check that the audio is recording properly earlier starting additional slides.
- Clear Feature - Select Clear to delete/re-record audio.
- Don't ready the camera to record - Make certain this button has a diagonal slash through it to avoid the problem.
- Seconds spent on each slide feature – Used for when a slide does not have sound, therefore it'due south recommended to have audio on each slide.
Mac Instructions:
The following instructions will teach you how to add sound to your PowerPoint presentation on a Mac and export that PowerPoint as an MP4. The text instructions cover the same information every bit the video embedded beneath.
Note: Information technology is essential to accept the Role 365 version of PowerPoint or you will not be able to save your PowerPoint as a video. If necessary, you tin can download it and other Microsoft Office products for gratuitous past going to office365.uwec.edu. If you have questions about updating or installing PowerPoint, contact the LTS Assistance Desk-bound at helpdesk@uwec.edu or 715-836-5711.
- Design and create your PowerPoint presentation.
- TIP: Use images and limit text to meliorate engage viewers/listeners.
- TIP: Use images and limit text to meliorate engage viewers/listeners.
- Click the Slide Show tab
- NOTE: Do non add together audio under Insert and Record Audio; this method volition non allow you to save your PowerPoint as a video since it does not synchronize timings to automatically move the slides with the audio.

- NOTE: Do non add together audio under Insert and Record Audio; this method volition non allow you to save your PowerPoint as a video since it does not synchronize timings to automatically move the slides with the audio.
- Click Record Slide Show
- Review the narration setup and navigation before recording.
- TIP: Earlier you brainstorm recording your total presentation, do a practice recording to verify your microphone and other settings are correct.
- Click the red circle recording button (elevation middle of the screen) to record the narration for the slide.
NOTE: Try to avoid reading the text written directly on the slide; use the slide to elaborate on the textile beingness presented. - Cease speaking for a second to preclude the audio from cutting out as slides modify. Resume speaking when the time starts moving once again under the Current slide timing feature.

- Click Pause and then End Testify when all the sound recordings accept been finished.
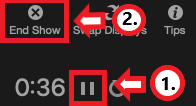
- Click Yep to the prompt The total time for your slide show was... to salve the audio narration.

- Check the audio by clicking on Play from Commencement under the Slide Show tab or the presenter fashion icon at the bottom of the screen.
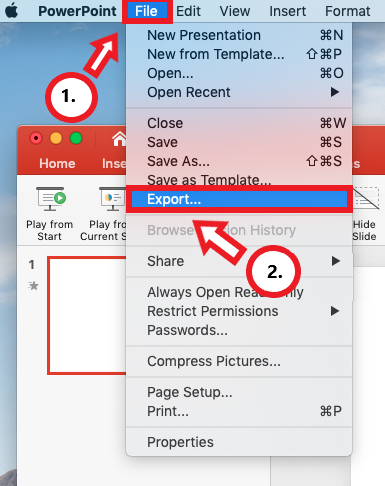
- To save the PowerPoint as a video, click File and and then select Consign. Nosotros too recommend saving your file as a regular PowerPoint before following the next steps for exporting your PowerPoint.
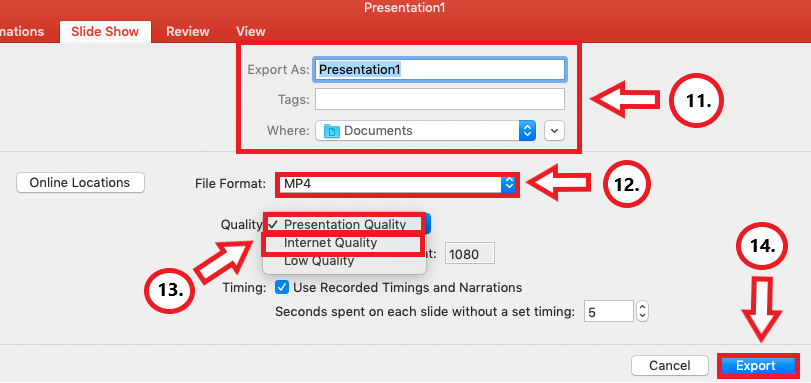
- Fill out text boxes (Export As, Tags etc.) follow PowerPoint's prompts.
- Select MP4 from the File Format options list.
- Select Presentation Quality or Cyberspace Quality. Presentation Quality will have longer to consign.
- Click Export
- Monitor the progress indicator at the bottom of the screen for when the video is no longer exporting.
Annotation: PowerPoint does not give an indication of how long the video will take to export.

- Upload your mp4 video to Kaltura or Sheet to share it:
- How to upload and share with Kaltura (Instructors should use Kaltura. Students volition need to utilize information technology if the file is over 500 MB, which a PowerPoint probably won't be and they can use Canvas.)
- How to upload and share in a Canvas consignment (students)
- How to upload and share in a Canvas word (students) - the instructions refer to the "rich content editor" which is just the features in the height of the discussion post respond.
Elaboration on the Recording Features:
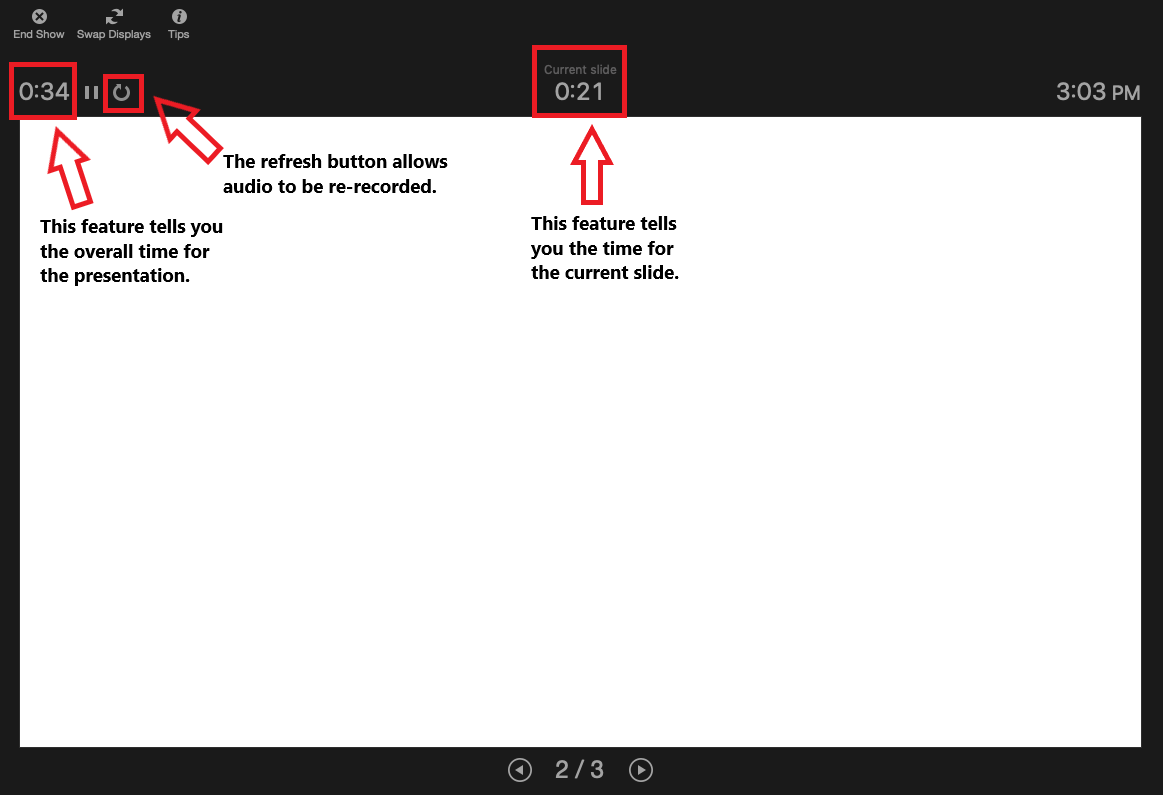
- Timing Feature – there is a rolling time feature for the individual slide and the overall presentation. Allows the presenter/speaker to keep an heart on how long they are talking.
- Seconds spent on each slide feature – Used for when a slide does not have audio, this is why it's recommended to have audio on each slide. Re-beginning the sound for a slide past clicking the refresh button.
- Refresh Feature – Re-start audio recording for a slide by clicking this button
NOTE: Sound starts recording automatically when this portion of the application is first opened. - Don't set the photographic camera to record - Brand sure this button has a diagonal slash through it to avoid the problem.
- Re-tape individual slides by selecting the desired slide and clicking Record Slide Show to start again.
Notation: Make sure to click Pause and so End Show when the slide has been re-recorded.
record a slide show with narration and slide timings
Source: https://www.uwec.edu/kb/article/how-to-add-audio-to-powerpoint-on-windows-10-and-mac/
